RESIZING uSD PARTITION
You may want to resize your partition to solve an issue with Win32 Disk Imager not being able to write to a new card due to it being slightly too small, or to change to a smaller SD card.
Here's what we want to do:
Resize the linux partition on the SD card to fit within the new space requirement, leaving an unused area after it
Resize the file system on that partition once its been changed.
Resize the .img file
First you need to reduce the size of the linux partition.
'gparted' is the graphical version of 'parted' and is the tool to use to resize the main partition used for raspbian (or you could use use parted if you prefer the command line of course!). It can also be used to check and repair a SD card disk.
To do this you'll need to put the SD card you want to work on in a USB to SD card adaptor and boot your RPi from a separate SD card. If you'd rather use a windows tool we've found that gparted just works whereas all of the windows based partition managers we tried don't, so better to just get over the hassle factor and use the RPi to do this if you don't have a separate Linux system.
From the command line use:
sudo apt-get update
sudo apt-get upgrade
sudo apt-get install gparted
To run it use 'sudo startx' to load the GUI as gparted needs root user privileges
Then from the start menu select run and enter 'gparted'
From the menu select gparted > devices > dev/sda (or whatever your external USB adaptor has been called).
Right click somewhere on the graphic and select 'unmount' first as operations can't be carried out on a mounted partition.
Right click the main 'ext4' partition and select 'check', then click the green tick and let it check the partition for you (this isn't essential but its a good idea as if there are issues it will likely cause the resize to fail).
Right click the main 'ext4' partition and select 'resize' then enter the new size you want it to be.
Right click the main 'ext4' partition and select 'check' (we've found this to be necessary to ensure the new partition size is correctly updated in the file system even though it should be done as part of the resize – kept us chasing constantly failed resizes for hours before we discovered this).
Finally click the green arrow button to carry out the changes.
Reboot the RPi (yep its stupid but we've found a reboot to be needed even after removing and re-inserting the SD card), sudo startx, run gparted, select the USB drive and check the ext4 partition is locked again (mounted) and has its boot string back.
Once the resize is complete you need to find out the total final size of the used space on the card (the FAT16 boot partition the RPi needs and the ext 4 partition that holds Linux, basically all the partitions before the unused area at the end of the card you've just created.
Now with the SD card booted up use the following commands to find the size of the area thats used:
sudo fdisk /dev/mmcblk0
Press 'p' then return to see the partitions.
For example you will get something like this:
Device Boot Start End Sectors Size Id Type/dev/mmcblk0p1 8192 122879 114688 56M c W95 FAT32 (LBA)/dev/mmcblk0p2 122880 12410879 12288000 5.9G 83 Linux
Get the End sector value for the last partition (12410879). Multiple by 512 (bytes per sector) to give you the target .iso file size (6,354,370,048 bytes) and make a note of this value (make sure you haven't made a mistake!)
Press 'q' then return to quit.
In this example we'll say we want our new card image to be 15400000 sectors (x 512 bytes per sector = 7,884,800,000 bytes)
Now shutdown the RPi and use Win32 Disk Imager. to read an .iso file from the SD card (we'll reduce its size after)
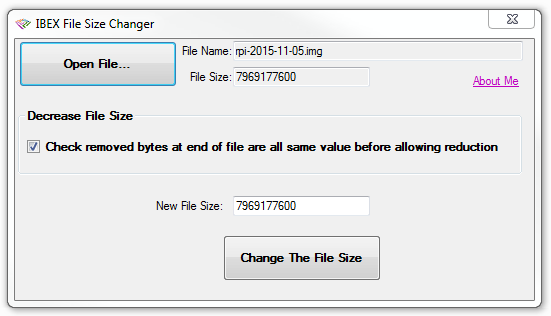
Download our IBEX File Size Changer app from here
Using this app open your .img file:
The .img file is simply a byte mirror copy of the SD card.
You can uncheck the checkbox as we don't care what the values of the bytes to be removed are in the unused space at the end of the card. Enter the new file size in bytes you calculated above and press 'Change The File Size'.
That's it, write the image to the smaller SD card and it should work fine.