PROCEDURE POUR RELIER 2 PBX ASTERIK
Connecting Two FreePBX/Asterisk
Systems Together Over the Internet
|
System 1: Extensions Numbered: 40 to
49 |
|
System 2: Extensions Numbered: 50 to
59 |
There
are four simple steps:
1.
Configure an IAX2
Trunk on System1, The Trunk will establish a connection with System2.
2.
Configure an Outbound
Route on System1. The Route will tell System1 which calls to send out to
System2.
3.
Configure an IAX2
Trunk on System2. The Trunk will establish a connection with System1.
4.
Configure
an Outbound Route on System2. The Route will tell System2 which calls to
send out to System1.
5.
1. Configure
an IAX2 Trunk on System1
Access the
Trunks Module on System1.
Click on the
"Add Trunk" link at the top, right hand side of the screen in the
Trunks Module.
Choose to
create an IAX2 Trunk.
Use these
parameters in the Trunk Settings:
Trunk
Name: System2
Outbound
Caller ID: CallerID
Dialed
Number Manipulation Rules: Usually Blank
Trunk
Name: System2
PEER
Details:
|
username=System1 secret=password host=system2ipaddress type=friend context=from-internal qualify=yes qualifyfreqok=25000 transfer=no trunk=yes |
Registration String: Blank.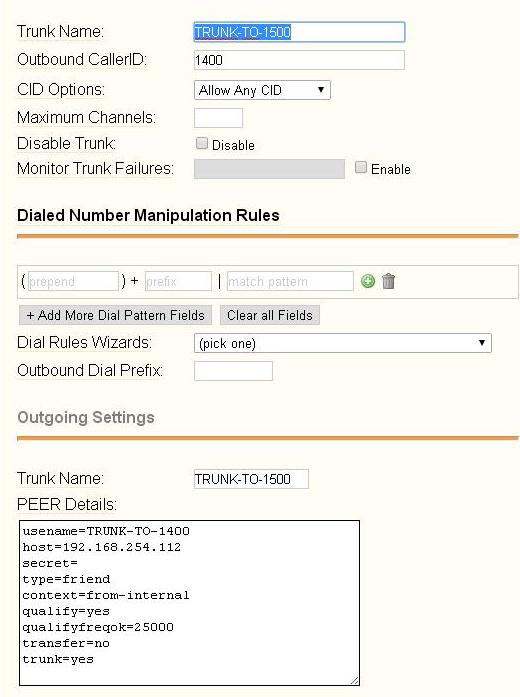
Notes:
1. Replace System1, System2, CallerID and
password with whatever you want. However, be consistent! If you
change System1, System2, or password in one spot, you must change it to the
same thing in all of the other spots (on both systems).
2. Capitalization Matters: System1 is not the same as system1 or
SYSTEM1.
3. If you have trouble making calls, your version of Asterisk may not have
the encryption routines installed. Try deleting the last three lines in
the PEER details on both systems.
4. If you only want to be able to place calls to the remote system, but do
not want the remote system to be able to call you directly, change
"context=from-internal" to "context=from-trunk".
2.
Configure an Outbound Route on System1
Access the
Outbound Routes Module on System1.
Click on the
"
Use these
parameters in the Route Settings:
Route Name:
InterOfficetoSystem2
Route
Route
Type: CHECK Intra-Company.
Dial
Patterns that will use this Route:
|
Patterns: ()
+ | 5X ()
+ | *805X ()
+ *81 | . |
What it does: If a user dials extensions 50
through 59, the call will be sent to System2. If a user dials *80 (or presses
an intercom button) and then extensions 50 through 59, the call be sent to
System2. If a user dials *81 and then
dials anything, the *81 will be removed and the rest of the numbers will be
sent to System2. |
Trunk Sequence: System2
Note:
1.
If your System2 does
not use extensions 50 to 59, you'll want to change 5X to match whatever pattern
you use. For example, if your System2 uses extensions in the 500 range,
you might change 5X to 5XX. See the
Dial Patterns tooltip for
more examples.
2.
If your System2 has
extension numbers that are the same as the extension numbers of your System1,
then you should delete the first two dial patterns.
3.
If you do not want
users on System1 to be able to dial *81 and then any feature code on System2,
delete the third Dial Pattern.
4.
If your System2 has
extension numbers that are the same as the extension numbers System1 and you do
not want your System1 users to be able to dial *81 and then any feature code on
System2, then you should delete all of the dial patterns and replace them with
these:
|
() + *81 | 5X ()
+ *81 | *805X |
If a user dials *81
and then extension 50 to 59, the *81 will be removed and the rest will be
sent to System1 If a user dials *81 and then *80 and then extension 50 to 59, the *81
will be removed and the rest will be
sent to System1 This is used for intercom calls. |

3. Configure an
IAX2 Trunk on System2
Access the
Trunks Module on System2.
Click on the
"Add Trunk" link at the top, right hand side of the screen in the
Trunks Module.
Choose to
create an IAX2 Trunk.
Use these
parameters in the Trunk Settings:
Trunk Name: System1
Outbound
Caller ID: CallerID
Dialed
Number Manipulation Rules: Usually Blank
Trunk
Name: System1
PEER
Details:
|
username=System2 secret=password host=system1ipaddress type=friend context=from-internal qualify=yes qualifyfreqok=25000 transfer=no trunk=yes |
Registration String: Blank.
Notes:
See the notes above, with respect to "Configure an IAX2 Trunk on
System 1."

4.
Configure an Outbound Route on System2
Access the
Outbound Routes Module on System2.
Click on the
"
Use these
parameters in the Route Settings:
Route Name:
InterOfficetoSystem1
Route
Route
Type: CHECK Intra-Company.
Dial
Patterns that will use this Route:
|
Patterns: ()
+ | 4X ()
+ | *804X ()
+ *81 | . |
What it does: If a user dials extensions 40
through 49, the call will be sent to System1. If a user dials *80 (or presses
an intercom button) and then extensions 40 through 49, the call be sent to System1. If a user dials *81 and then
dials anything, the *81 will be removed and the rest of the numbers will be
sent to System1. |
Trunk Sequence: System1
Note:
1.
If your System1 does
not use extensions 40 to 49, you'll want to change 5X to match whatever pattern
you use. For example, if your System1 uses extensions in the 400 range,
you might change 4X to 4XX. See the
Dial Patterns tooltip for
more examples.
2.
If your System1 has
extension numbers that are the same as the extension numbers of your System2,
then you should delete the first two dial patterns.
3.
If you do not want
users on System2 to be able to dial *81 and then any feature code on System1,
delete the third Dial Pattern.
4.
If your System1 has
extension numbers that are the same as the extension numbers System2 and you do
not want your System2 users to be able to dial *81 and then any feature code on
System1, then you should delete all of the dial patterns and replace them with
these:
|
() + *81 | 4X ()
+ *81 | *804X |
If a user dials *81
and then extension 40 to 49, the *81 will be removed and the rest will be
sent to System1 If a user dials *81 and then *80
and then extension 40 to 49, the *81 will be removed and the rest will be
sent to System1. This is used for intercom
calls. |
What Ports do I
need to Forward?
None.
If you use IAX2
Trunks and configure them as indicated above, the IAX2 protocol will keep the
ports open for the other system.
What If I Want to
Connect More Than Two Systems?
There are two
ways to do this.
1. You
can connect each system to the other independently following the instructions
above, i.e.
System 1 to
System 2
System 1 to
System 3
System 2 to
System 1
System 2 to
System 3
System 3 to
System 1
System 3 to
System 2
2. You can
1.
Connect System 1 to System 2
2.
Connect System 2 to System 3
3.
Configure the
4.
Configure the
The first
option is far more reliable, as it permits each system to connect directly to
each other system.